If you are new to CNC, then you may not have come across datums before. This masterclass will tell you everything you need to know about datums and how to use them.
Why are datums important?
Datums are essential for positioning jobs on SmartBench.
You will need to reposition your job if:
You need to start cutting in a new area of the stock material.
You are working with a new piece of material which may be in a new place.
Your new job size is different from the previous one.
Job positioning is therefore something you can expect to do fairly frequently! Luckily, datums make positioning very fast and easy to implement.
Introduction
A datum is simply a reference point in 3D space. Datums are found in both:
Job files
SmartBench’s workspace
SmartBench is able to align these datums to quickly position jobs.

Here’s the basics:
Every job file has its own datum, which is set when it is created in the CAD/CAM software. This is fixed within the file.
SmartBench also has its own, separate datum which we will call a “working datum”. This working datum can be moved around SmartBench’s available workspace.
When SmartBench loads a job file, it will align the job file’s datum to SmartBench’s own working datum; this is how the job file gets positioned.
When SmartBench’s working datum is repositioned, the job file is repositioned with it.
The image below illustrates how SmartBench aligns these datums to position a job.
A: Job file and job file datum
B: SmartBench’s working datum
C: SmartBench aligns both datums to position the job

Job file datum
The datum in the job file, set during the CAD/CAM phase, needs to be defined in all three axes: X, Y and Z. Once defined, the job file datum remains fixed after the file has been exported.
To illustrate this, we’ll use an example project.
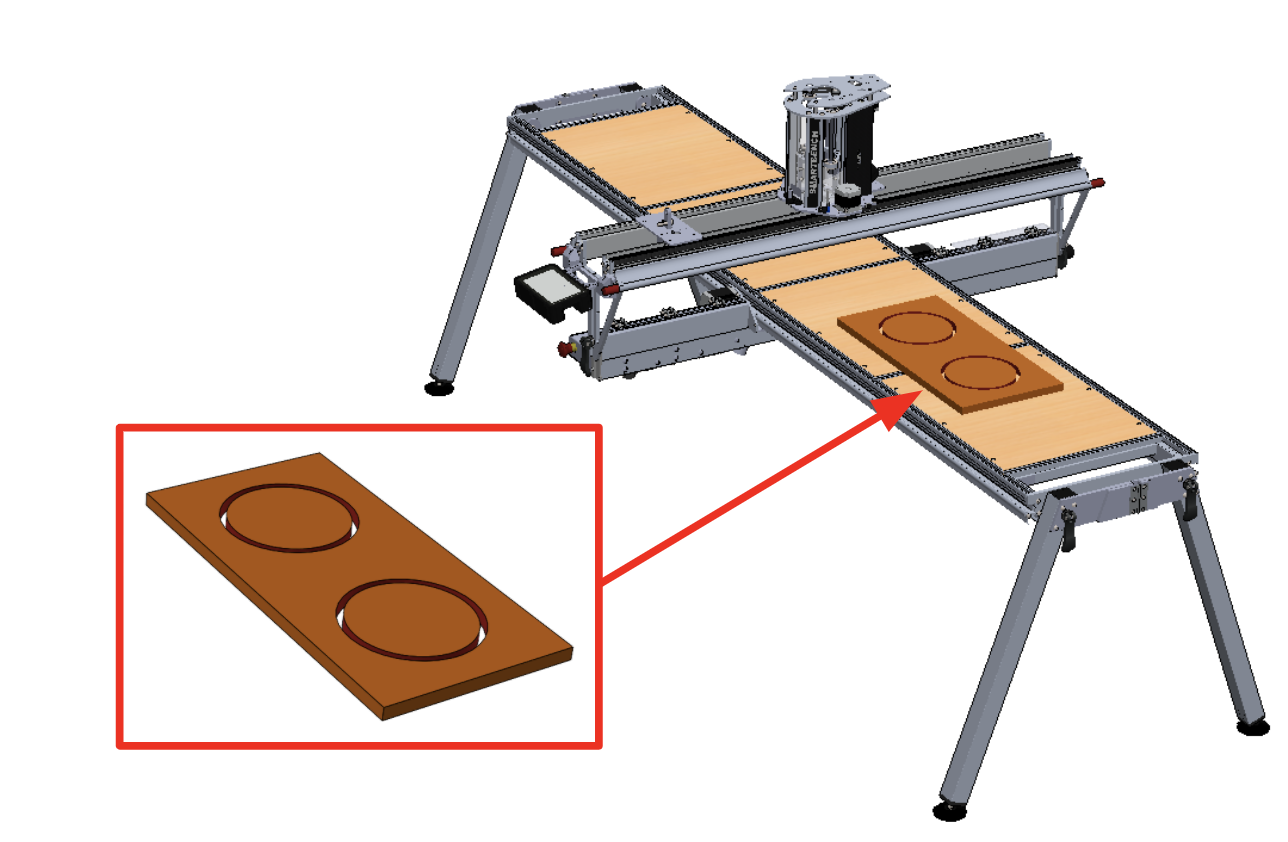
An example CAD/CAM project
In this example, we have a stock piece of material, aligned with the XY plane, which we want to cut 2 circles from. Here is the concept:
D: Stock material
E: Circular parts

Defining the datum in the CAD/CAM stage
Now we’ll define a datum using the tools in the CAD/CAM software. In this example, we’ll position our datum to be at the bottom left corner of the stock material, on the top surface.
The datum is illustrated as a large target, but it is representing the exact corner point.
F: Job file datum

Once the datum has been set, and the project has been fully defined in the CAD/CAM software, we’ll export the job into a file.
Once the job file has been exported, this information cannot be changed:
|

When we import the job file into SmartBench, SmartBench will use this datum to position the job in SmartBench’s workspace.
SmartBench’s working datum
The yellow box below represents SmartBench’s working volume, or workspace. SmartBench can set its working datum anywhere within this workspace.

SmartBench’s working datum is set in two stages:
XY plane
Z axis
SmartBench’s working datum in the XY plane
The diagram below shows SmartBench’s working datum in the XY plane.
G: SmartBench’s workspace in the XY plane
H: SmartBench’s working datum

When you load a job on SmartBench, SmartBench automatically positions it by aligning the job file datum with SmartBench’s working datum.
J: The job file is positioned, with its datum aligned to SmartBench’s working datum.

SmartBench’s working datum can move anywhere within the workspace, and the job file will follow.
You need to position SmartBench’s working datum such that the job file lands completely inside SmartBench’s workspace! |


SmartBench’s working datum in the Z axis
Looking at the end view of SmartBench, we can see the height of SmartBench’s workspace (the Z axis) and the position of SmartBench’s working datum within SmartBench’s workspace.
K: SmartBench’s workspace in the Z axis
L: SmartBench’s working datum

When you load a job on SmartBench, SmartBench automatically positions it by aligning the job file datum with SmartBench’s working datum.
N: The job is file positioned, with its datum aligned to SmartBench’s working datum.

You need to position SmartBench’s working datum such that the job file lands completely inside SmartBench’s workspace! |
M: Job file correctly positioned – here the stock has space underneath it for a spoil board.

P: Job file correctly positioned – here the stock is placed directly on the bed.

Q: Job file incorrectly positioned – the job runs into the machine bed!

What next…
That’s it. Now your job file is fully positioned in the X, Y and Z axes, and SmartBench now knows where to start work 🙂.
Useful datum knowledge
Can SmartBench’s working datum be repositioned after setting it?
Yes. SmartBench’s working datum can be repositioned as many times as you like, until you are satisfied that the job file is in the right place.
Can a job file datum be changed within the job file?
No. Once the CAD/CAM software exports the job file with its datum, the datum remains with the job file fixed in its relative space. The only option is to re-export a new job file from the CAD/CAM, with the job file datum in the new preferred position.
Can the job file be rotated once it’s positioned on SmartBench?
No. The job file has to be oriented with SmartBench’s axes in mind during the CAD/CAM design phase.
Will the datums be saved?
Yes, both datums will be saved in their respective environments, and therefore positions will not be lost.
Job file datums
Once job files have been exported from CAD, the job file datums cannot be changed and will be saved with the file.
SmartBench datums
SmartBench datums will be saved every time they are set. They will persist even between power cycles.
SmartBench’s working datum is saved in the Z Head electronics, not the Console. |
The job file datum is set when designing the job in the CAD/CAM software. We’ll show you where the buttons are, and then illustrate the workflow with an example.
While we will show you this example in Vectric V Carve PRO, you will need to set your job file datum via a similar workflow in other CAD/CAM software packages.
How do I set a job datum in Vectric?
The job file datum is set up in Vectric as you create a new job.
Open Vectric and click on “Create a new file”.

Setting the job file datum’s position in the XY plane
In the XY Datum Position section of the Job Setup you will have a choice of 5 options for positioning the job file datum in the XY plane:
In any of the 4 corners of the job.
In the centre of the job’s bounding box.

Click here to learn more about the pros and cons of choosing different datum positions.
Setting the job file datum’s position in the Z axis
The Z Zero Position section of the Job Setup window is where you set the position of your job file datum in the Z axis.
You can choose from two options:
Material Surface: the job file datum will be positioned on the top surface of your stock material.
Machine Bed: the job file datum will be positioned on the bottom surface of your stock material (which is functionally the same as the top surface of your spoilboard).

Click here to learn more about the pros and cons of choosing different datum positions.
Save settings
After choosing your settings, click on the OK button to save the job file datum.

Where do I see my job file datum as I design my project?
The position of the job file datum is marked with the 0s on the rulers, and by the crosshair in the job screen.

For example, if you want to change your job file datum to be in the centre of the job, the crosshair and position of the 0s will change its position accordingly.

How do I edit my job file datum in Vectric?
If you need to change the settings for the job file datum later, you can open the existing file and go to Edit > Job Size and Position.

The Job Setup window will open, where you will be able to check or change the settings.
Axis orientation on Smartbench
It is important to draw the features of the job in the same orientation as it will be cut.
The job axes orientation and job datum position cannot be changed on SmartBench; SmartBench will only align the job datum with the working datum.

X and Y axis
The width (X) and height (Y) of the job will align with SmartBench’s X and Y axes, respectively, when it is loaded onto SmartBench.

Note how the orientation of the job in Vectric matches the orientation of the axes on SmartBench. |


Z axis
The thickness (Z) of the job will align with SmartBench’s Z axis when it is loaded onto SmartBench.
A worked example
In this section we will show how we can use Vectric (CAD/CAM software) to set a job file datum for a simple project.
For this example, we have a stock piece of material which we want to cut two circles from.
A: Stock material
B: Circular parts

Using the steps described above, we will set the job file datum in the bottom left corner and on the top surface of the stock.
In Vectric, this means that we need to set:
XY Datum Position: bottom left corner of the shape outline.
Z Zero Position: Material Surface.

We will then generate a toolpath (we won’t detail how here. Click here if you want to learn more about how to create toolpaths).

If we look top-down on the stock and the XY plane, the job file datum is on the bottom left corner of the job.

If we take a side on view of the job, the job file datum is on the top surface of the job.
When we position this job on SmartBench, we will position SmartBench’s working datum on the top surface of the stock material, and on the corner of the stock that is closest to SmartBench’s home position.
You will need to set the position of SmartBench’s working datum in the XY plane and the Z axis separately.
Once you have set SmartBench’s working datum in the X, Y, or Z axis, SmartBench will remember the position on that axis until you change it. You can move SmartBench away from the position of its working datum without needing to reset it again before starting a job. |

Preparing to set SmartBench’s working datum
You will need to know what a datum is, and how to home and move SmartBench before you can set SmartBench’s working datum.
Click here to learn more about manual moves. Click here to learn more about homing SmartBench.
In the Console menu, click on the “Pro” App.

If SmartBench is not homed already, home SmartBench now.
Setting SmartBench’s working datum without homing first could cause the job to run in a place you did not expect, and cause damage to the workpiece. |


Click on the manual move tab on the left hand side of the Console screen.

Setting SmartBench’s working datum in the X and Y axes at the same time
You can set SmartBench’s working datum in both the X and Y axis at the same time.
A: Target datum position

Using the laser datum to set the working datum position
If you have not already, you will need to have set your laser datum offset. If you’d like to learn how to do that, please click here.
Using the manual move buttons, align the laser crosshair with your chosen position for SmartBench’s working datum.


When you are happy, press the SET datum button in the bottom middle of the Console screen.
This sets SmartBench’s working datum to this location in X and Y axes simultaneously.


Check the “Use laser datum?” checkbox, and press “Yes”.

The machine will position the tool over the point where the laser crosshair was. This is a good time to check that the tool is where you need it to be. |

Using the tool center to set the working datum position
If you are using the tool as your reference point (as opposed to the laser crosshair), you may want to lower the tool closer to the material surface using the Z axis controls.

Position your cutter over the point that you want to position SmartBench’s working datum, using the XY manual move buttons.
Once you are happy with the position, press the SET button on the Console.
Press Yes to confirm your choice.

If you have the laser datum enabled, but would prefer not to use the laser on this occasion, uncheck the checkbox and press “Yes”.

Setting SmartBench’s working datum in the X and Y axes individually
There are times when you may want to set the position of SmartBench’s working datum in one axis at a time.
You can use either the laser or the tool to position SmartBench’s working datum, confirming in the same way as you did when positioning SmartBench’s working datum in both axes simultaneously.
Setting SmartBench’s working datum in only the X axis
On the manual move tab, select the “SET X” button.

Setting SmartBench’s working datum in only the Y axis
On the manual move tab, select the “SET Y” button.

Checking the working datum position
You can check the working datum position, and make sure that the job file is within SmartBench’s workspace by looking at the map tab on the Console. Here you can see:
A: The footprint of the job file in the XY plane.
B: Job file datum and SmartBench’s working datum aligned.

Move SmartBench to the position of its working datum
Move SmartBench back to the position of its working datum in any individual axis by using the “GO” buttons on the manual move tab.

Or, move SmartBench to the position of its working datum in the XY plane by using the “GO” datum button on the map tab.

You will need to set the position of SmartBench’s working datum in the XY plane and the Z axis separately.
Once you have set SmartBench’s working datum in the X, Y, or Z axis, SmartBench will remember the position on that axis until you change it. You can move SmartBench away from the position of its working datum without needing to reset it again before starting a job. |

Preparing to set SmartBench’s working datum
You will need to know what a datum is, and how to home and move SmartBench before you can set SmartBench’s working datum.
Click here to learn more about manual moves. Click here to learn more about homing SmartBench.
In the console menu, click on the “Pro” App.

If SmartBench is not homed already, home SmartBench now.
Setting SmartBench’s working datum without homing first could cause the job to run in a place you did not expect, and cause damage to the workpiece. |


Click on the manual move tab on the left hand side of the Console screen.

Use the manual move buttons on the Console to position SmartBench above the surface (e.g. the spoilboard) that you want to use as the reference for the Z axis position of SmartBench’s working datum.
When you position SmartBench’s working datum in the Z axis, you do not need to worry about SmartBench repositioning its working datum in the XY plane. |


A: Target datum position


There are two ways to position SmartBench’s datum in the Z axis:
Using manual moves to set SmartBench’s working datum in the Z axis
Using the manual move buttons, move SmartBench in the Z axis to your desired position for SmartBench’s working datum position.

Lower the Z axis until the tip of the tool touches the work surface.

Press the SET datum button on the bottom right of the console screen to set the position of the working datum in the Z axis.

Using the probe plate to set SmartBench’s working datum in the Z axis
SmartBench’s working datum can be set automatically using the Z probe plate, which SmartBench will use to find the surface of the material.
Before using the probe plate, you may want to toggle the speed to high and use the manual move buttons to move SmartBench along the Z axis, closer to the material surface.

Remove the Z probe plate from the back of the Z head, and place it underneath the tool tip.

Ensure that the tool tip is over the centre of the probe plate.

Press the Z Probe button on the right hand side of the console screen.

SmartBench will automatically detect when the tooltip has touched the Z probe plate, and set its working datum.
When SmartBench’s working datum has been repositioned and set successfully, you will see the red and yellow cut zone moves to where the tool is in the virtual tool image on the console screen.
The yellow box represents the tool retract height, and the red box represents the depth of the cut.
A: Tool retract height.
B: Depth of cut.

Checking the working datum position
You can check the working datum position, and make sure that the job file is within SmartBench’s workspace by looking at the graphic next to the Z move buttons on the Console. When you have set the datum, you will see the red and yellow cut zone move to where the tool is in the virtual tool graphic.
The line at which the red and yellow boxes meet represent the height of the Z working datum (also referred to as Z0).
The yellow box represents the tool retract height (moves above Z0), and the red box represents the depth of the cut (moves below Z0).
A: Tool retract height.
B: Depth of cut.

You can position the job file datum anywhere on the surface of the job file. There are, however, certain positions that are better than others, depending on your application.
When you position the job file datum, consider how it will align with SmartBench’s working datum, and where your stock material will be in SmartBench’s workspace.
Choosing the position of the job file datum in the XY plane
It is most common (and easiest) to position the job file datum either in the centre of the stock (A), or one of the corners of the stock (B).

When should I position the job file datum in a corner?
When using rectangular shaped stock material, a corner is a good place to put the job file datum; when the job is loaded onto SmartBench, it will be very easy to line up the tool or laser crosshair with the corner of the stock.
The bottom left corner is the easiest place to set the job file datum, as you will then set SmartBench’s working datum at the corner of the stock material that is closest to the home position, and closest to the user operating the console. |

One potential downside of using the corner is that if the corner of the material is damaged, or non-square, you won’t have a sharp reference point to set SmartBench’s working datum against.
When should I position the job file datum in the centre of the job?
Using the centre of the material as the datum is useful when you are processing pre-cut material, for example: if you are engraving onto a piece of material that is already cut to size, and you want to guarantee that the engraving is centred on the material.
We recommend marking the centre of the stock, so that it is easy to line up your tool or laser crosshair when you set SmartBench’s working datum. Using a straightedge and a pencil, draw two diagonal lines from the corners of the stock, such that they cross in the middle. When you position SmartBench’s working datum, use the centre of the cross as your reference. |
Using the centre can also be a good option if the stock material you are using is an odd shape, or not the same size or shape that you originally specified in your CAD/CAM package.
If the stock material you are using is longer than SmartBench’s Y Bench, position the job file datum in the centre of the job, as you will not be able to position the tool or laser crosshair over a corner.
Choosing the position of the job file datum in the Z axis
You can position the job file datum either on the top (A) or bottom (B) surface of the stock material.

When you come to set SmartBench’s working datum it needs to match the job file datum (so both datums should either be set on the top or bottom surface of the material).
If you position the job file datum on the bottom surface of the stock material, you will set SmartBench’s working datum against the spoilboard. |
The best place to position the job file datum depends on your application.
When should I position the job file datum on the top surface of the stock?
The top surface of the material is easier to access, especially when working with a large sheet, so it can be a good option if your stock material is covering your whole spoil board.
The top surface is also a good option if you are only working on the top surface of the material, for example: engraving or pocketing as opposed to contouring.
The main drawback to using the top surface is that it doesn’t account for the variation in material thickness. This can lead to worse finished part accuracy as well as inconsistent tab thickness when contouring.
When should I position the job file datum on the bottom surface of the stock?
Using the bottom surface of the material does account for variation in material thickness which will increase the finished part accuracy, as well as improving the quality and consistency of your tabs when parting off.
The main disadvantage of using the bottom of your stock material is that it can be hard to access if your stock material covers your spoilboard.
If the material is thicker than specified in your CAD/CAM toolpath, referencing the bottom surface as your datum will mean that the first pass of the tool will be cutting more material than expected, which may require you to alter your feed rate for that pass. You can alter the feed rate during the job, using the controls on the SmartBench Console. |
